CHECK YOUR BOW’S SPECS

Look over the bow and check all the screws are tight (sight, rest, cam mods, etc). Make sure all the cables are routed correctly on the cams and through the cable slide.
Verify that the following are in spec:
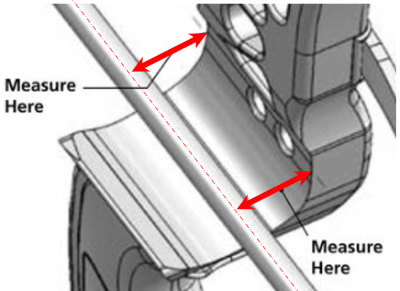
• Axle to Axle
• Brace Height
o Furthest part of the grip to the string.
Set your Center Shot to 13/16” by moving your rest (this is a starting point).
Make sure arrow is going through the center of berger hole.
On a draw board check the following:
• Cam Timing
o Add twist to the cable on the cam that touches first.
• Drop Away Rest Timing (draw board or just draw bow)
• Draw Length
o Add twist to the string to reduce length
o Add twist to the cables to increase length
• Draw Weight (Draw board or hand held scale)
o Mark your screws with a paint pen to make sure you are turning them full or half turns
o On most bows one full turn is 3 pounds
Check Vane Clearance with Cables and lower shelf of riser.

Collapsible content

Paper Tuning

This is just a starting spot for things to come later. What this step is doing is getting your arrow coming out of your bow straight out of your bow (point directly in front of the nock). Shooting through paper with vanes on the arrow makes it easier to see what is happening when you are new to it.

Shoot an arrow through paper at roughly 5 yards or less. You don’t want to shoot to far because the arrow could start compensating and stabilizing for misalignment between the point and nock. Try to find paper that is pretty stiff to show the tears better. The brown Kraft paper that things are shipped in seams to work pretty well.

Broadhead/Bareshaft Tuning

After you have Paper Tuned your bow, start shooting at further distances until you are dialed in at 20 yards and hitting a spot repeatably with fletched arrows. Then shoot a bare shaft (unfletched) arrow at 20 yards at the same spot without touching your sight. Chances are that your bare shaft will not hit the same point. This is just a further refinement of the tuning process and only takes slight adjustments of your rest to dial this in. Once your bare shaft is hitting the same spot as your fletched arrows, then your broadheads will as well. You can do this same thing with fletched arrows and fletched broadheads, but it tends to be a little less expensive to use a bare shaft.

HIGH TEAR / LOW BARE SHAFT OR BROADHEAD

  • Check cam timing
  • Check rest timing (might not be coming all the way up)
  • LOWER the Nocking Point (about thickness of a dime)
  • RAISE the Rest (about the thickness of a dime)

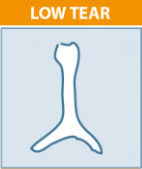
LOW TEAR / HIGH BARE SHAFT OR BROADHEAD

  • Check cam timing
  • Check rest timing
  • RAISE the Nocking Point (about the thickness of a dime)
  • LOWER the Rest (about the thickness of a dime)

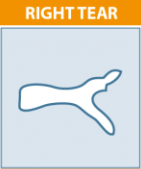
RIGHT TEAR / LEFT BARE SHAFT OR BROADHEAD

  • Check vane clearance
  • Twist RIGHT yoke / UNtwist LEFT
    yoke
  • Move cams to RIGHT
  • Check vane clearance
  • Move rest to LEFT (about the
    thickness of a dime)

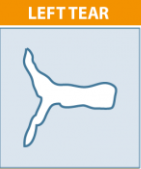
LEFT TEAR / RIGHT BARE SHAFT OR BROADHEAD

  • Check vane clearance
  • Twist LEFT yoke / UNtwist RIGHT
    yoke
  • Move cams to LEFT
  • Check vane clearance
  • Move rest to RIGHT (about the
    thickness of a dime).

ADJUSTMENT / SHOOTING NOTES

  • Practice on your form before you start. Consistency is king.
  • Shoot more than once! Don’t make a change unless you shoot a few times and see the same thing.
  • Don’t shoot on windy days. When you shoot a bare shaft you need to be as perfect as possible with your form to get good results.
  • Very small adjustments will make huge differences.
  • Write everything down and mark your rest starting spot with a pencil.
  • Count out loud as you add or remove turns.

Make sure all bolts are tight and mark settings on your rest with a pencil line. This way you can quickly check to make sure nothing has changed. Also if you make changes later you have a reference for how far you’ve moved. While your tightening screws go back over all of the other screws (rest, sight, cam mods, etc).